Sunday, September 16, 2012

Place Value

I decided to share a couple of place value games that I have come up with and utilized in my classroom:

Place Value Battleship

My kids LOVE Battleship so I decided to use that to my benefit.  Here is how the game works:
The kids partner up and each student receives a "game mat" and 2 sets of number 1-9 (that are cut apart).  They separate their game mats with a folder and then make up any 7 digit number they want using 1 set of the 1-9 numbers with out telling the other player. They place the cards on the game mat in the "my number" spot.  They then take turns guessing the individual digits of their partner's number.  For example Johnny might say, "is there a 3 in your hundreds place" at which point Suzie looks at her hundreds place and sees she has a 5 there. So she would respond with "higher" indicating to Johnny that his next guess for her hundred's place should be higher than 3.  If Johnny makes a correct guess, Suzie will respond with "hit" at which point Johnny uses his second set of numbers and places the correct number in the correct place under the "My Partner's Number" place on the game mat. Meanwhile Suzie flips over the number that he "hit" indicating it was "sunk".  Once one of the players feels they have correctly guessed each individual digit they then have to read the number back to the person in order to officially win the game.


Human Place Value Chart

For this one my goal was to get my kids use to and aware of the different place value positions especially with decimals.  Before class  I made a set of numbers 0-9, laminated them, and attached a string from end to end. I then taped off a place value chart on my floor that included the thousandths place through to the hundreds place, and placed a four square ball in the middle to represent the decimal point.  I then gave 10 of my kids individual numbers they could wear around their neck.  I gave the remaining students individual white boards and dry erase markers to follow along as we create the number.  I had 20 different 3-6 digit numbers placed on index cards that we used for each round.  I would pick one of my "white board" kids to read off the individual digits in any order (there's a 1  in the tenths place, there's a 9  in the hundreds place, and so on ) so that the kids wearing numbers could place themselves in the appropriate slot.  Once everyone is placed I have a different white board kid, read the number correctly to everyone.  I then finish the round with asking the white board kids to give me the value of certain digits. If I felt they understood and comprehend how to find value, I let them switch with someone in the place value chart, if not, then they stay for another round or two.
*Note - I am fortunate enough to only have 16 kids in each of math classes this year, so one set of numbers worked for me. If you have a rather large class you may want to split them into two groups with two place value charts.


Hope you enjoy the games! Let me know if you need any further explanation or if you would like a copy of the place value battleship, I will be happy to send it to you!


-Amy

Monday, September 3, 2012

Two Sisters Teach ... and CRAFT!!!


So much of our time and energy goes into our teaching and families, but sometimes we do have a little extra time to do something else we love... CRAFT! As you have probably figured out the Cricut and vinyl are our favorite way to craft ;) We have dedicated several blog posts to things we have created for our rooms, but Amy and I also absolutely love to make things for our family and friends.  Here are just a few of the things we have created:
Personalized coolers 
A few more personalized cups!
 
This is my cup for work- I love it because it holds 48 ounces!!!


A sign for our mom's wall.  It's part of a  picture display.

A personalized platter- the perfect wedding gift!


We just love coming up with new vinyl creations.  It's so exciting when someone calls and asks us to make something!!!

-Andrea :)

Tuesday, August 28, 2012

180 Days of Math

I stumbled upon this book at the beginning of last school year, and have loved it ever since.  When I purchased the book I was looking for a way to help my students maintain information all year long.  I have found in the past that when I try to review with my kids right before our State Standardized Test, it's like starting from scratch with the topics that we went over in first semester.  This book answered all my prayers. 
Here's what is great about this book: there are 12 problems everyday and each problem is aligned to a particular math skill, for example #5 is always a fraction, decimal, or percent question and #10 is always a graphing question.  This way my kids are practicing all 12 topics all year long and when it comes time for that dreaded standardized test, the review isn't so overwhelming!

Here is how I use it in my classroom:  I call it their "Daily Math Practice."  I give each student a folder (color coded by class) and inside that folder is a chart that you can print from the CD ROM that comes with the book.  On this chart I can keep track of how many problems they missed and which ones (so if Johnny keeps missing #5 I know he needs help with fractions, decimals, and percents). This is also where they keep their assigned worksheet for that day.  I copy the pages front and back, but they only do one side per night.  This worksheet then becomes their nightly homework (Monday-Thursday), that they have to have complete and turned in by the next morning.  I am lucky enough to have a 1st hour prep so I grade all the folders during that time period.  Then when it is time for their math class they get the folders returned to them and we go over the results and correct answers.  Now when it comes to counting them for a grade, I do not grade them on their perfection rather I grade them on their attempt.  I don't feel it's fair to take points off on topics that we haven't even covered yet.  So instead I take them for a completion grade; if they are finished and turned in on time they receive 5 points, if they are late or incomplete they receive 0.  The hardest part about this whole system is explaining it to parents, and that it is OK for their child to miss certain problems (especially at the beginning of the year). Other than that I love it and I have seen some great results because of it!

Here is a link where you can purchase the book if interested:

http://www.amazon.com/s/ref=nb_sb_noss_1?url=search-alias%3Dstripbooks&field-keywords=180+days+of+math

 They have them for all grade levels K-6. Check it out, I promise you won't be disappointed!

-Amy

Wednesday, August 22, 2012

Monthly Self Portraits

 I hope everyone's school year is off to a great start!  I forget how exhausting the beginning of the year is, so excuse this short post.  But I love this idea and wanted to share! Each year I put together a memory book for my students.  One of my favorite things to include in this book is  "monthly self portraits."  At the beginning of each month I have the students write his/ her name and draw a self portrait.  It is amazing the progress made by the end of the year.  It is a very simple page:


This is something that could definitely be adapted for several grade levels.  I just love being able to see the progress!!!

I haven't quite figured out how to include a document for download yet :(. If you would like the pdf of these, just email and I will send them to you!  As soon as things settle down at school, it is my goal to figure out how to include a document in my posts!!

-Andrea :)

Monday, August 20, 2012

5th Grade Read Alouds

Now that school is in full swing, I thought I would share some of my favorite read alouds.  This is my 5th year of 5th grade; every year I seem to find a book that I absolutely love and add to my "Read Aloud Library."  I don't know what I am going to do when I have too many favorites and not enough time to read them all!

So the first book I read every year is "The Top 10 Ways to Ruin The First Day of 5th Grade"which is about a 5th grader and his obsession with David Lettermen's Top 10 lists. It even takes place in Kansas City, Missouri and talks about MIZZOU - it couldn't be more perfect, plus my kids absolutely love it!  However, it wasn't until I started writing this entry that I realized the book is apparently now out of print and has become crazy expensive.  I guess I do have some comfort in the fact that I suddenly have a little financial security blanket sitting on my bookshelf!  So I apologize if you don't have this book or can't get your hands on it, because then this is really of no use to you.  However, if you can get a copy, I like to make it my theme for the first couple of days. I show my kids a "Top 10 About Mrs. Alferman" power point that I made, then I have them create their own "Top 10 Things You Should Know About Me" paper.   Here is a link to the book just in case you need to know what you're looking for or you want to make a classroom investment :)


http://www.amazon.com/The-Ways-Ruin-First-Grade/dp/0823418510


I fell in love with the "Swindle" series from the very beginning!  These books follow a group of kids that  first came together in order to prove a point and correct something that the adults would never figure out on their own.  I love these books, and my kids can't wait to hear the next chapter everytime I start them!


http://www.amazon.com/Swindle-Gordon-Korman/dp/0439903459/ref=sr_1_2?s=books&ie=UTF8&qid=1345502346&sr=1-2&keywords=swindle+series


These next two books both came from recommendations by other teachers.  My friend Cheryl recommended "The Wednesday Wars", and it is honestly a book that I look forward to reading every year!  My friend Nikki recommended "Abduction" after she said her 5th graders loved it and mine would too, and I couldn't believe how right she was!  These are both definite musts every year!


http://www.amazon.com/Abduction-Peg-Kehret/dp/0142406171/ref=sr_1_1?s=books&ie=UTF8&qid=1345502542&sr=1-1&keywords=abduction


http://www.amazon.com/Wednesday-Wars-Gary-D-Schmidt/dp/054723760X/ref=sr_1_1?s=books&ie=UTF8&qid=1345502560&sr=1-1&keywords=wednesday+wars


I hope you guys enjoy the books above!!

Does anyone have any other recommendations?  I know I would love some new read alouds and I am sure others would too!  Let me know!


-Amy

Sunday, August 12, 2012

Tips and Tidbits

 Sorry for the lack of posts this last week, Andi and I went on a small vaction with our family to relax - because as crazy as it sounds, school starts THIS week!! So today I thought I would share a couple of little things that I have found helpful in my classroom, and hope you do as well!

Erasing Permanent Marker from Laminate:

As most teachers do I laminate all my posters and decorative accents before writing on them, however dry erase markers wipe off too easily and permanent markers are too hard to erase.  So I discovered this tip on the Internet a couple of years ago, and it has become a staple in my routine.  If you take a black dry erase marker and  scribble over the permanent marker, it easily erases and your cute classroom decorations are good to go for another year!


Attaching Non-Laminated Items With Hot Glue

Hot glue is God's gift to teachers and decorating, however, it's not so friendly to paper products that have not been laminated.  So thanks to my good friend and fellow hot glue aficionado, Jill - she taught me that if you put a strip of scotch tape on the back of your letters or borders and then put hot glue on that strip, your items come off easily and aren't ruined afterward!


Paper Trays

I had these two paper trays that hold my loose leaf and scrap paper, but the problem was, they were too big and took up too much room on my table. Once again my hot glue gun came to the rescue and I made my own stackable paper tray by turning one perpendicular to the other and gluing them together.


From Organizing Jewelry to Organizing Lunch

I found this jewelry organizer for about $5 at Dollar General and it worked perfectly for lunch count.  It originally had 12 small pockets so using some hot glue I was able to separate two of the larger pockets into 6 smaller ones giving me 20 individual student pockets that I numbered using some vinyl and a 1 inch circle punch.    I then punched circles in 3 different colors, 1 for school lunch, 1 for sack lunch, and 1 for salad.  I housed the circles in the bottom pocket, and will have my kids put the appropriate color circle in their pocket when they first enter in the morning.


Tuesday, August 7, 2012

Andrea's Classroom Tour

Here are few pics of my room!

This is the board where I keep track of book reports and discipline.  One half is titled Star Readers and the other half Star Students.  You can also see my oil drip magnet board for building words to the right.  The rules above the board can be found here

My calendar/ group area.  I have a polka dot rug for the kids to sit on.  It works out really well because each kid has their own "spot"!


This is where I meet with students and behind it you can see my reading corner as well as my word wall.  The popcorn boxes were another Pinterest find.

This is the door to the closet I share with the teacher next door.  I don't know what I would do without the closet or Jenny, the teacher next door!

A view of our cubbies and the shelves that house Literacy and Math centers. This is also where I  display the "masterpieces" my little dears make me.  The colored clocks (a Target dollar spot find) are set to the times the kiddos constantly ask about -specials, lunch, recess and home!

This is my desk area.  Behind it you can see my copy holder- I have one slot for  each day of the week.  It is a life saver!  The multi-colored drawers house my calendar stuff!

This is the door to bathroom ( I have a love/hate relationship with it- it's convenient, but it smells a little funky!!!)  I keep track of those that can count to 100 and those that can tie shoes on here.  I found those cute signs on Pinterest of course!  There are so many generous and creative people out there!


This is the board outside of my room.  It says "There's a Spot For You on Our Learning Safari."  I wanted to be able to have some polka dots and keep with our school-wide theme!


I love these Good Listener rules.  You can find them  here

I tried to give credit where credit was due by linking to the printables I have used in my room.  If  I missed something I apologize!  


Saturday, August 4, 2012

Desk Make-over

I did a lot of things differently this year when it came to decorating and setting up my room, and I was really excited about it! But one thing continued to bug me- my desk! Oh my gosh it was so ugly, army green and straight out of the 1970s.  Something had to be done, it definitely did not match the rest of my room.  Everyone knows I love the cheapest (and cutest) solution to a problem; well I found a coupon for Duck Tape. I was amazed at how many patterns and colors there were to choose from!!  I found one that matched the decor of my room; I just needed to figure out what else I could use. So using a little inspiration from Amy's file cabinet re-do, I considered fabric to wrap the desk.  However our nearest fabric store is 45 minutes away- very frustrating!! Then I remembered we have rolls of vinyl in the storage room at school.  I use it for my bulletin boards, but most of the good colors are gone.  I really wanted black, but had to settle for white (it still turned out pretty cute).  So using some free vinyl and a $3 roll of Duck Tape , I came up with this:

-Andrea :)

Friday, August 3, 2012

Bulletin Boards

Bulletin boards have to be one of the most time consuming and frustrating things that I work on in my classroom, and yet, I LOVE them!  Changing bulletin boards is one of my least favorite things to do, but once I come up with an idea I like, I can't wait to put it up!  The majority of my bulletin boards don't change throughout the year, my Math and Social Studies boards will change to represent the unit we are on, but the backgrounds and borders stay the same - which is a huge time saver! 

We will start with my favorite - my social studies board


I wanted my bright colors and polka dots to continue onto my social studies board - so using my handy dandy punches I decided to make our country look a little more fun!


This is the only bulletin board that is a repeat from last year  - I worked pretty hard on this one and wanted to get more use out of it - plus it technically has polka dots!


I found this saying on Pinterest and decided to turn it into a bulletin board for next to my door.


Technically this isn't a bulletin board - but close enough!  I wanted to put something above my books, and being the math teacher, I couldn't help but incorporate a little arithmetic!


We also have a board in our hallway, and in the past I have changed it out every season, this year I wanted to come up with something that I wouldn't feel obligated to change all the time -  I am pretty happy with how it turned out!  I purchased the mirror from Goodwill for $3, I then took it out of its frame and attached it using some fun duck tape I found at Wal-Mart.


-Amy

Tuesday, July 31, 2012

AAAAHHHHH!


Whew I feel a little better now!  I'm getting to that point of summer vacation where I just don't think I will be ready.  I have lots of things still on my to do list.  My room is however slowly, but surely coming together.  I have changed some things around and added some great Pinterest finds ;).  One of my favorite Pinterest projects has to be my reading bench-


Well guess how excited I was to find these at Target for $3.  I am a labeling and organizing fool, so these are perfect for me.  They clip right on the handle of the fabric totes in my bench!


 I promise to post a tour very soon- we have Kindergarten Connection next week so you can expect some pics then!

I also wanted to use this post to give a shout out to some people that make my job so much easier! We all already know my sister is one of them, but besides her I also work with some other incredibly talented people.  I am so lucky to have an amazing Kindergarten team.  They are so good about sharing their hard work and creativity; I would be more than lost without them. Another person I am blessed to work with is Christie from First Grade Fever.  And yes she is as talented and sweet as it seems!  I am using several of her creations in my room this year.  I just love her Bright Dots Classroom Kit which you can read more about here.

-Andrea :)

Sunday, July 29, 2012

Gushing Gifts

As back to school all too quickly approaches,  I have been thinking about Open House, and what gift or treat I am going to give my students this year.
 About a month ago, while at a teacher store I picked up some "5th Grade Rocks" pencils like I always do thinking I would just set one on each desk for the first day of school.  Then about 2 weeks ago I was in Target enjoying one of their amazing clearance sections, when I spotted some summer themed crazy straws. They had marked them down to 90% off, which meant I was going to get 3 straws for 10 cents! Every teacher enjoys a good bargain, and I just couldn't pass them up.  So then I got to thinking about what I could use them for.  I gave my students the "Crazy Kool" gifts that you so often see on Pinterest at the end of last year, and I am not one for repetitive gift giving!  So after much consideration and willing myself to come up with something clever, I chose the following!


This was so easy to do, I taped the straw and pencil to one end of the gusher packet, rolled it over a little bit at the top, taped it again and then wrapped it in some fun ribbon.  As far as the labels are concerned, I could not have done them with out one of my amazing punches.  If you do not have any of these, I suggest you get to your nearest craft store immediatly and purchase a couple - they are a life saver!  My mom was gracious enough to give Andrea and I each our own set made up of different shapes and sizes for Easter last year, and they have become one of my classroom essentials!  If you are intersted in the labels I am more then happy to share them with you!  Just email us at twosistersteach@gmail.com and I will send you the PDF!

-Amy

Friday, July 27, 2012

Smart Choices

I saw on Pinterest recently a super cute idea- Kiss Your Brain and Hug Your Heart.  I thought this was really clever-  Hershey Kisses for smart academic choices and Hershey Hugs for good social choices.  I however have decided to combine these two things and just have one container titled "Smart Choices."  I plan to fill the container with Smarties and hand out one individual candy when a student is making a smart choice- academically or socially.  I think this will work well for me because I already use this language in my classroom.  I try to consistently remind my students that things happen because of their choices:  Are you making a good choice? or I'm sorry you made a poor choice or Suzie has made a great choice by reading quietly. Also I am not a fan of Smarties so I won't want to eat the whole container like I would if it was chocolate ;)!!!

-Andrea :)

Wednesday, July 25, 2012

Ribbon - my new favorite!

I have a new favorite decorating staple in my classroom....RIBBON!  I love it for so many reasons, but mostly because you can find some really cute styles for pretty cheap.  Here are a few ways I am using it this year:

To spruce up some posters-


To add a little flair to some boring baskets-


To hang letters in my reading nook-


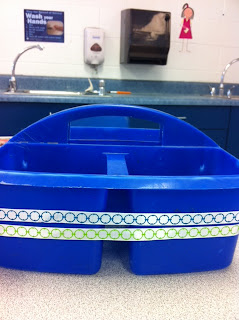
To add a little life to my supply caddies (I found these for $1 a roll at Michaels)-


Do you have any cheap decorating tips that make a big impact?  I would love to hear them!

-Andrea :)

Monday, July 23, 2012

Turn It In!

Teaching Math to three different classes along with a Social Studies and a Science class, makes having an organized turn in station, pretty important.  I decided this year I needed one central location for all the baskets and trays I have for collecting homework, as well as the fact that it needed to be on a table that sat lower to the ground, in order for the shelf I have to be an appropriate height.  So what better table to use then a coffee table!  I actually had this old drab wooden table in my basement, but it was orginially purchased from a resale shop for $10.


I sanded the table, added a couple coats of black paint, and finished it off with what else but my Cricut and some colorful vinyl. 


Now I have the perfect turn in station where my kids can hand in their homework and daily math folders, as well as see if they might be "Missing Something"!


-Amy

Saturday, July 21, 2012

Sign Me Up

There are two things you will learn about me very quickly:
1. If I see a super cute idea, I will try my hardest to figure out how to make it myself (OK usually with the help of my sister).  Sometimes I succeed and sometimes I fail miserably!!
2. I love, love, love my Cricut and self adhesive vinyl!
This post will prove both of these things!!!


I'm sure most of you have seen those adorable name signs floating around Pinterest.  I fell in love with a polka-dot (which I also love A LOT) one .  I decided with my trusty Cricut and some bright colored vinyl I could make something very similar.  I made a trip to Michaels for the rest of my supplies: some canvases and some cute ribbon (which has become a staple in decorating my room this year, I have a future post planned about it actually). Then my good friend Jenny, who also happens to teach next door to me, and I got together to make a few and my sister and I got together and made a few more!!  


Here are 2 of the 11 I have made so far:
Sorry for the not so good pic! Can you tell which one I took with my old phone? ;)
-Andrea :)